This user guide is specific to those users that have system functionality limited to accreditation
Here are the basics
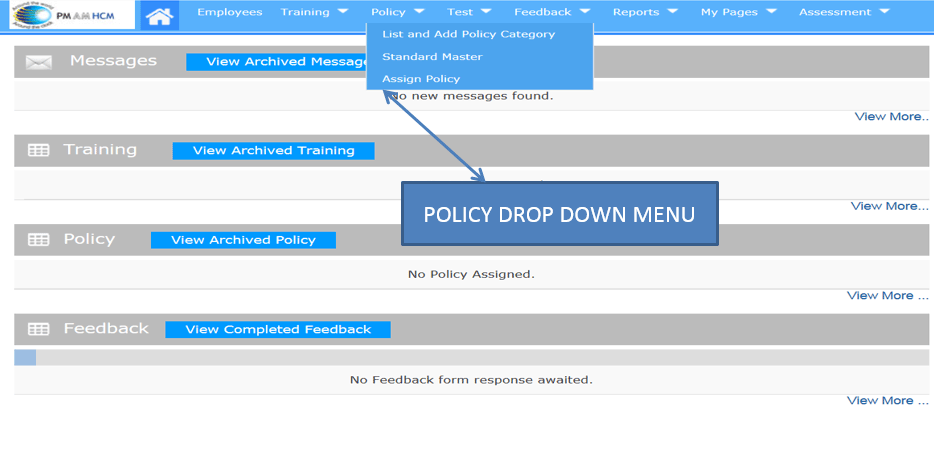
THE DROP DOWN SCREEN FROM THE POLICY FOLDER OFFERS 3 OPTIONS.
Standard Master - This is where your aligned accreditation standards are loaded
Assign Policy - Assigning policies to your team is only available to full functionality users

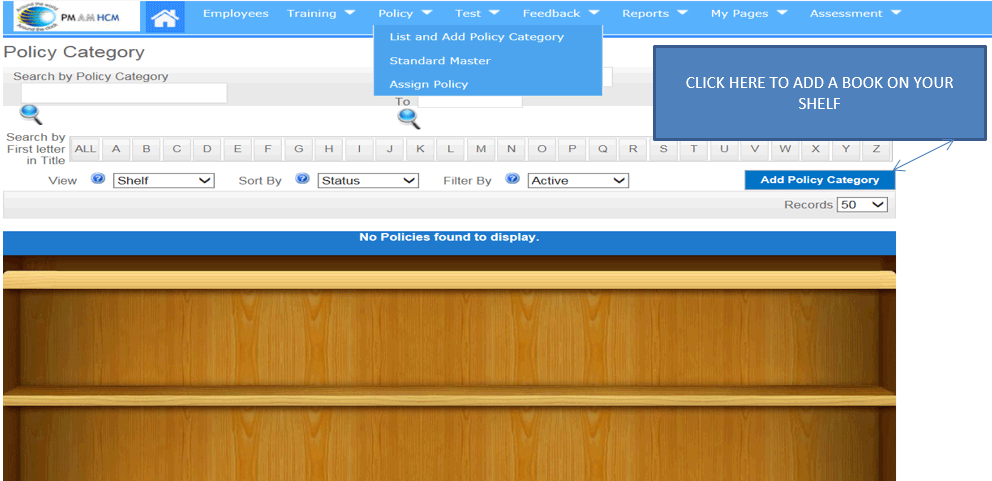
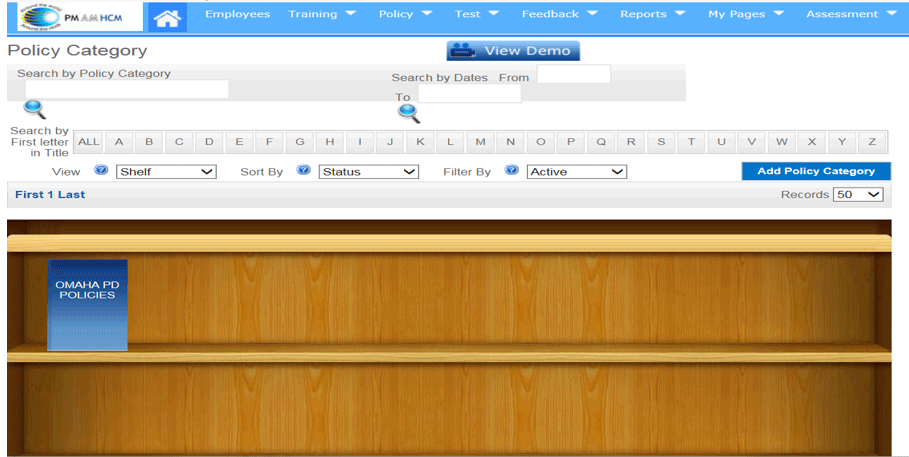
BY CLICKING ONTO “LIST AND ADD POLICY CATEGORY” YOU WILL BE DIRECTED TO THIS BOOKSHELF SCREEN
Each book you place on this bookshelf can include multiple policies or documents
CLICK ON “ADD POLICY CATEGORY’ AND NAME YOUR BOOK
Add Policy Category
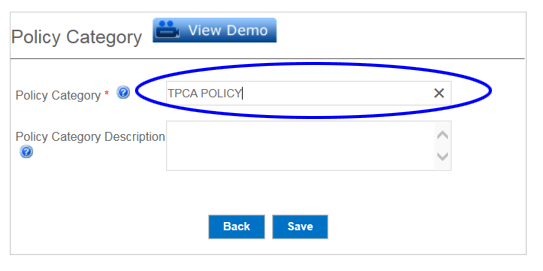
This is the option that appears when you select “ADD POLICY CATEGORY, you are only required to enter a “POLICY CATEGORY” name of your choice as listed below, Once a policy category name is entered click SAVE.
Policy Bookshelf
ONCE YOU HAVE NAMED YOUR BOOK, HERE IS HOW THE BOOKSHELF WOULD BE DISPLAYED
ONCE YOU HAVE LOADED A BOOK NAME
MULTIPLE BOOKS CAN BE LOADED IN A CROSS DEPARTMENTAL VIEW
(SEE NEXT SLIDE)
Adding Policies
TO ADD POLICIES TO A POLICY BOOK, SIMPLY CLICK ON THE SPECIFIC BOOK YOU ARE LOOKING TO LOAD POLICIES INTO
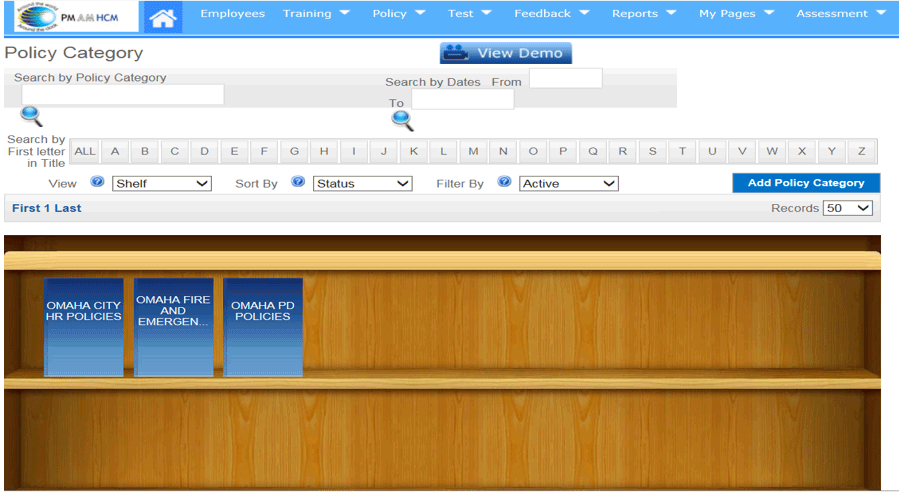
Viewing Your Policy Folder
(NOTE: THIS WILL ALLOW YOU TO CREATE A MAIN CONTENT PAGE)

Adding a Main Content Page
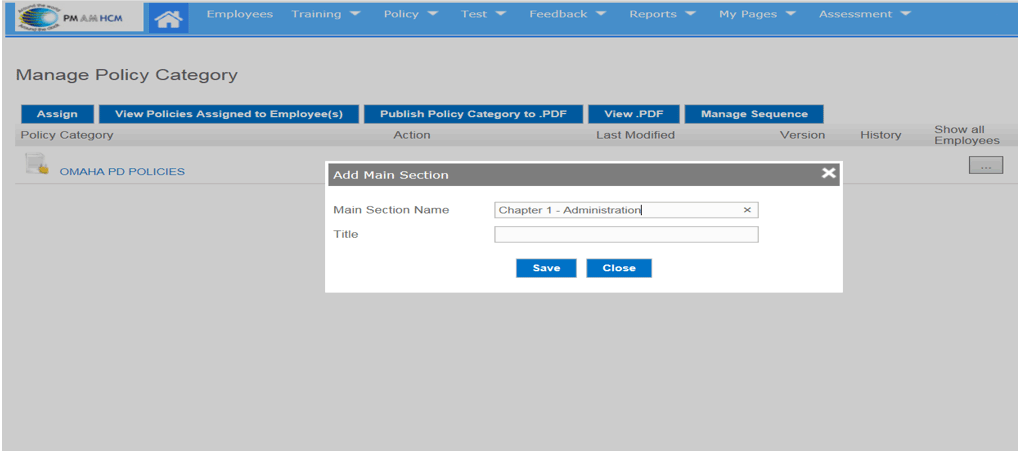
When you click on “ADD” it opens a dialog box that allows you to name a “MAIN CONTENT PAGE”
Think of a main content page as a chapter in a book. It could be Chapter 1 or it could be a naming convention such as “ADMINISTRATION” and with all aligned policies loaded below
Step 1 - Add the name of your main content page on the top line of the dialog box “Main Section Name”
Step 2 - Providing a Title name on the 2nd line is optional
Step 3 - Save the changes you have made

Creating a Main Section Name
I have created a main section name - “Chapter 1 – Administration” and now I simply select “SAVE”
Preparing to Load Policies in Your Folder
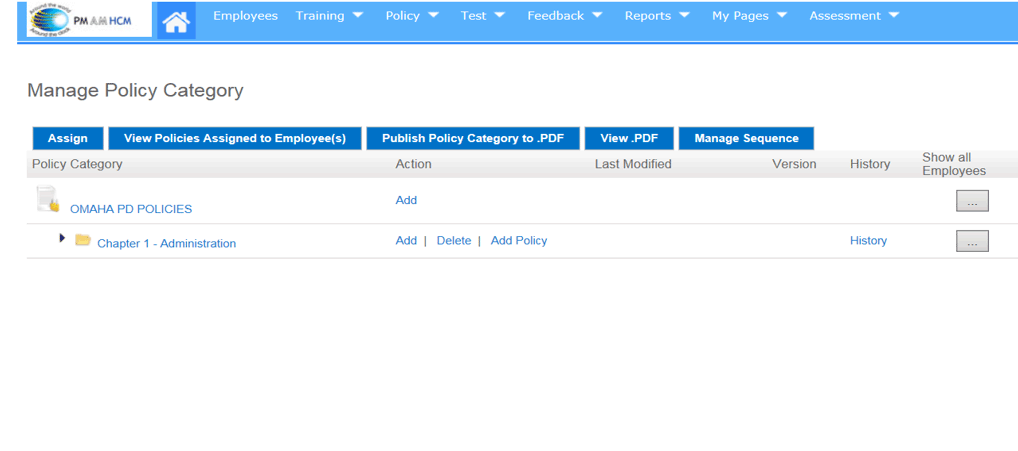
What you see now is the main book name and you now have a chapter. The other options that are now present include “ADD” – “DELETE” - “ADD POLICY” - “HISTORY”
Let’s move to the next slide to view each of these options
Adding Sub-Content
Adding a Sub-Content page is seldom required.
Think of this option as add a sub-chapter such as Chapter 1.1
You will not often find it necessary however if you need to create a sub-chapter or category you can do so by clicking on “ADD” to the right of the Chapter name.

Deleting Policies or Main Categories
Most policies and chapters on occasion require updates or changes.
You can process these updates and changes without deleting the current version
You might find this feature useful during the initial loading of your policies in the event you made a mistake

Add Policies
“ADD POLICY” is what you use to add your individual policies.
CLICK ON “ADD POLICY”
The next few screens will walk you through the various components of the Add Policy Feature

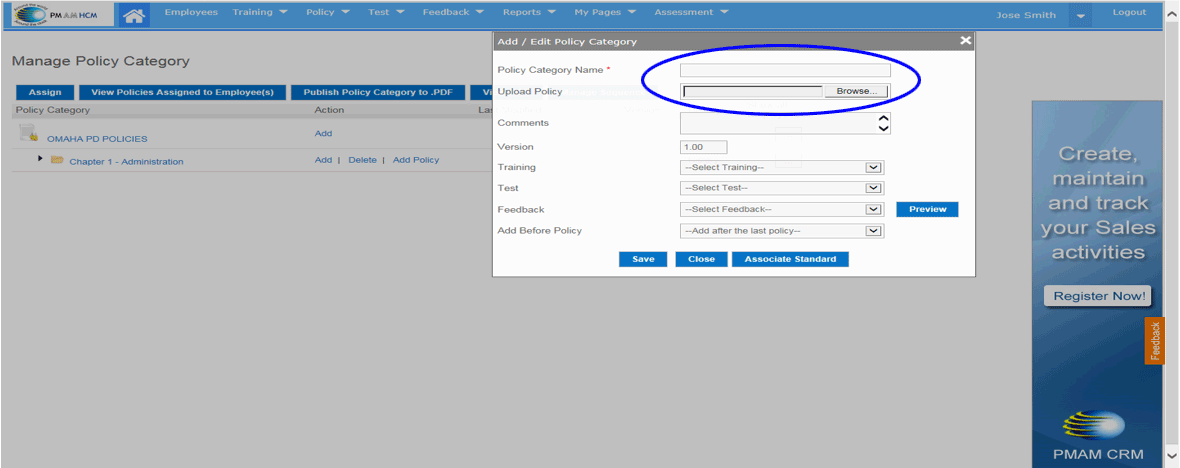
Add Policy
Clicking on “ADD POLICY”
opens a Dialog Box
STEP 1
On top line, “Policy Category Name”, create a numbering and naming convention.
i.e. 1.0 Administration
STEP 2
Click on Browse and Find your Word file or PDF file and open to load into system
Associating Policies to Accreditation Standards
In the accreditation process, you will often find that a policy is not a one to one relationship with standards. You may have policies that are aligned with multiple standards and standards that have multiple policies.
For accreditation, you need to prepare and mark these correlations
TO ALIGN YOUR POLICIES WITH THE APPROPRIATE STANDARDS, CLICK ON “ASSOCIATE STANDARD”
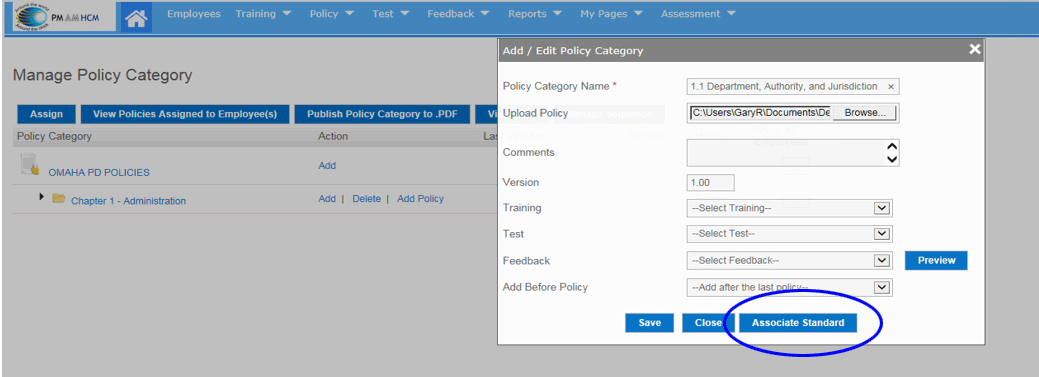
Aligning Policies and Standards
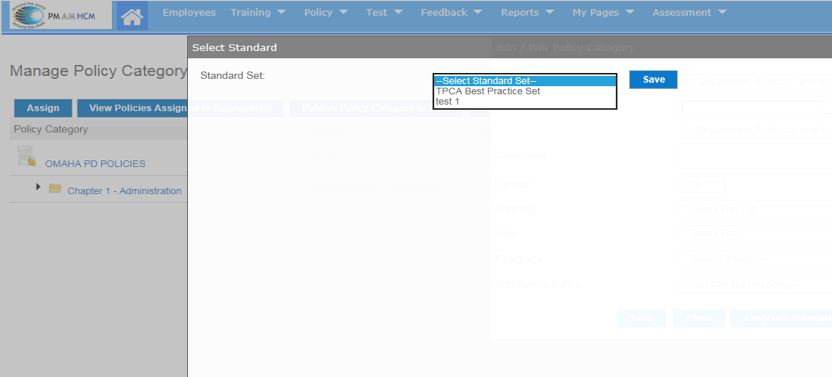
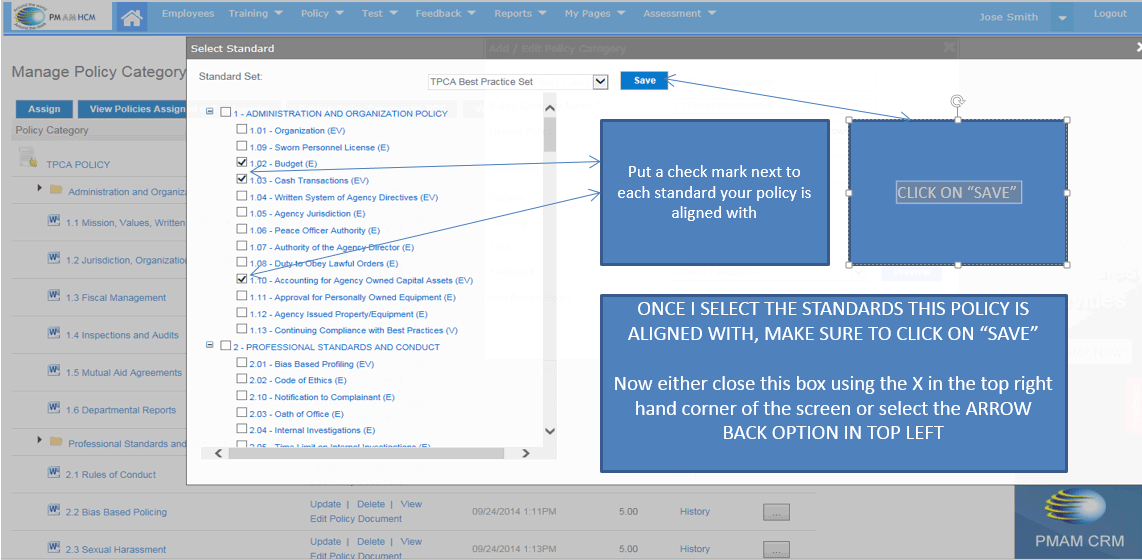
Once you have clicked on “Associate Standard”, this dialog box will open
Click on the Arrow and you will see your State Standards open
Click on your standards to move to the next step
Standards and Policies Association
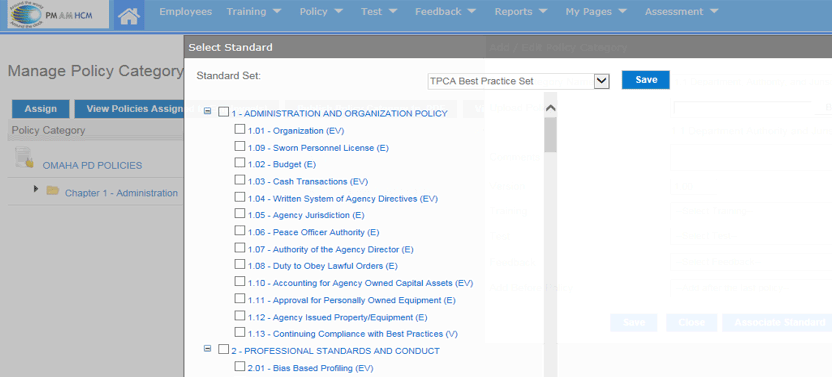
Once you have clicked on your state accreditation option, you will immediately have access to all your accreditation standards
You now can select the standard or standards that align with this specific policy and then click “SAVE”
How To Associate Your Policy to a Standard
Put a check mark next to each standard your policy is aligned with
ONCE I SELECT THE STANDARDS THIS POLICY IS ALIGNED WITH, MAKE SURE TO CLICK ON “SAVE”
Now either close this box using the X in the top right hand corner of the screen or select the ARROW BACK OPTION IN TOP LEFT
CLICK ON “SAVE”
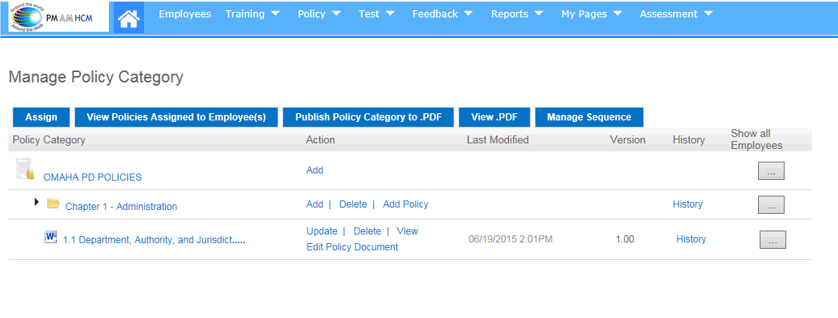
View of Loaded Policy
As you will note, your first policy is numbered and named and is associated to the correct accreditation standard/s with the Word Document Loaded.
You are set and ready to repeat this process to add the next policy
It is important to note: When you have completed all Chapter 1 policies, you will then need to go all the way back to the top, (Omaha PD Policies) line, and click on “ADD” to name the next Chapter. Now repeat the process to load Chapter 2 Policies
Flagging Policy Verbiage to Align With Standards Requirements
Assessors want to be directed to the verbiage in each policy that aligns with each standard
They don’t want to read a 15 page policy to understand the portion of the policy that aligns
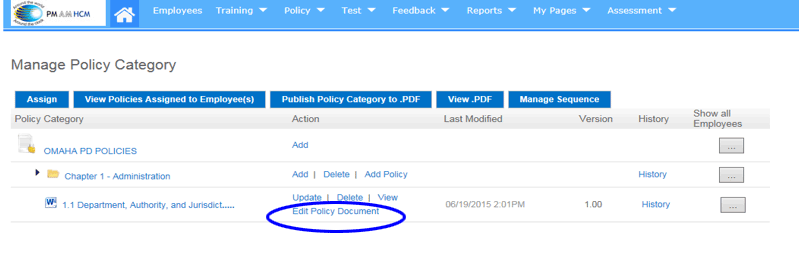
This can be done using MS Word either prior to loading your policies in the HCM or after by using the “EDIT POLICY DOCUMENT” feature in your policy folder
The following slides will help you understand how to handle this task from the Edit Policy Document feature
Step 1: Flagging Policy Verbiage
CLICK ON “EDIT POLICY DOCUMENT”
NOTE: MAKE
SURE THAT YOUR POP UP BLOCKER SETTINGS MAKE AN EXCEPTION TO ALLOW POP
UPS FROM THE PMAM HCM OTHERWISE YOU WILL NOT BE ABLE TO VIEW THE POLICY
IN A WORD DOCUMENT VIEW
Step 2: Flagging Policy Verbiage
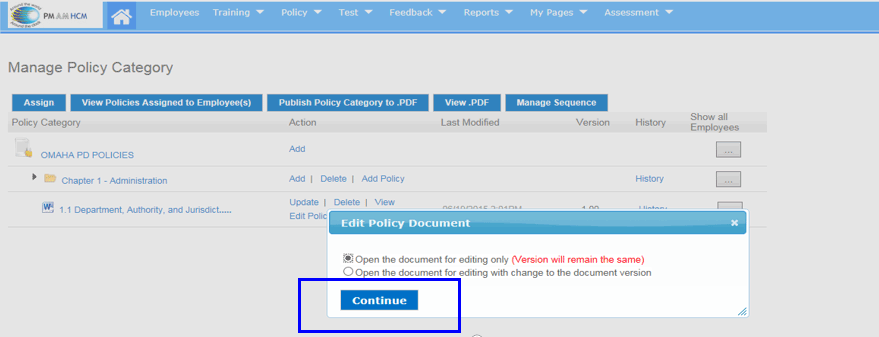
PLEASE NOTE: YOU WILL ALWAYS BE ASKED IF YOU DESIRE A NEW VERSION OF THE POLICY. YOU CAN CHOOSE TO MAKE A POLICY VERSION CHANGE OR NOT.
ONCE YOU MAKE YOUR CHOICE CLICK “CONTINUE”
Step 3 Flagging Policy Verbiage
THIS IS THE POP UP THAT YOU WILL SEE ASKING YOU IF YOU ARE SURE THIS FILE IS SAFE.
THE FILE IS YOUR SO YOU ARE SAFE TO CLICK ON OK
Note: If you do not see this popup, make sure that you revisit your popup blocker and make an exception for pmamhcm.com
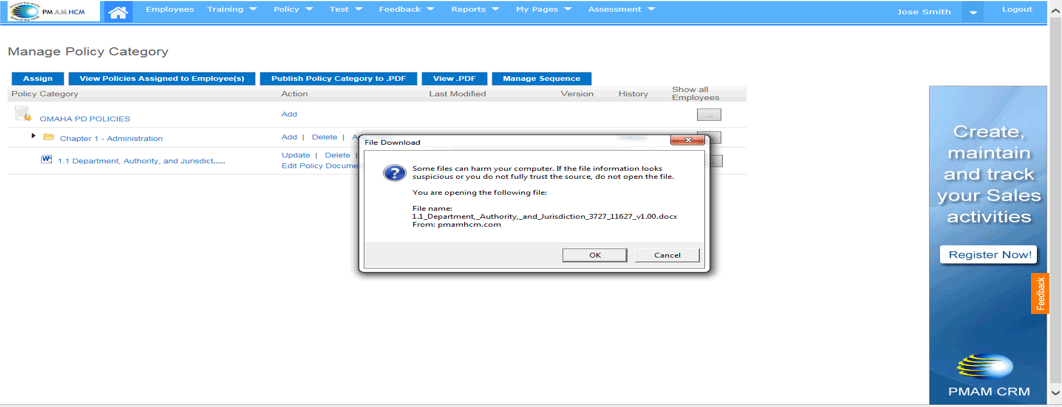
Step 4: Flagging Policy Verbiage
YOUR POLICY WILL OPEN IN A WORD DOCUMENT FORMAT.
Let’s assume that the first paragraph of this policy applies to Standard 1.5
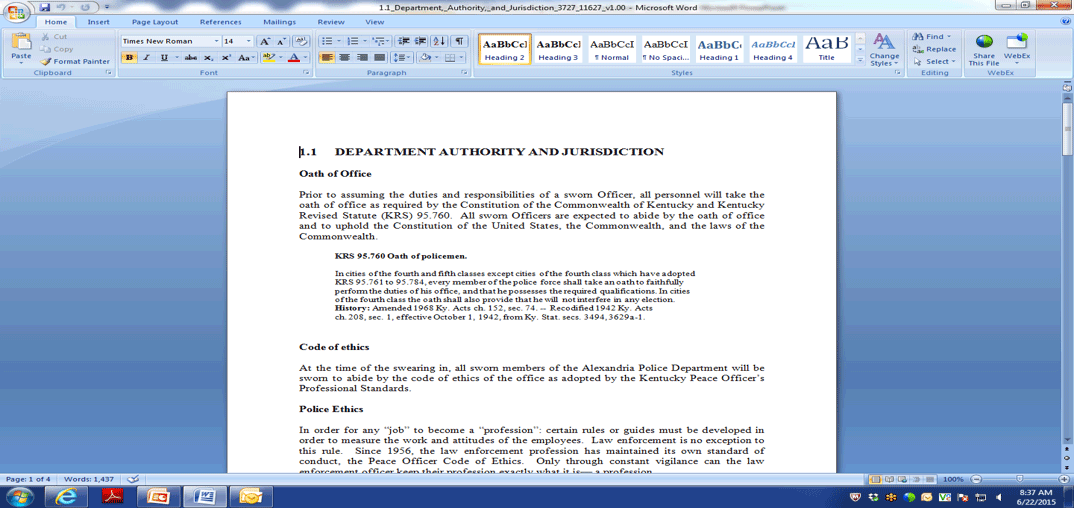
Step 5: Flagging Policy Verbiage
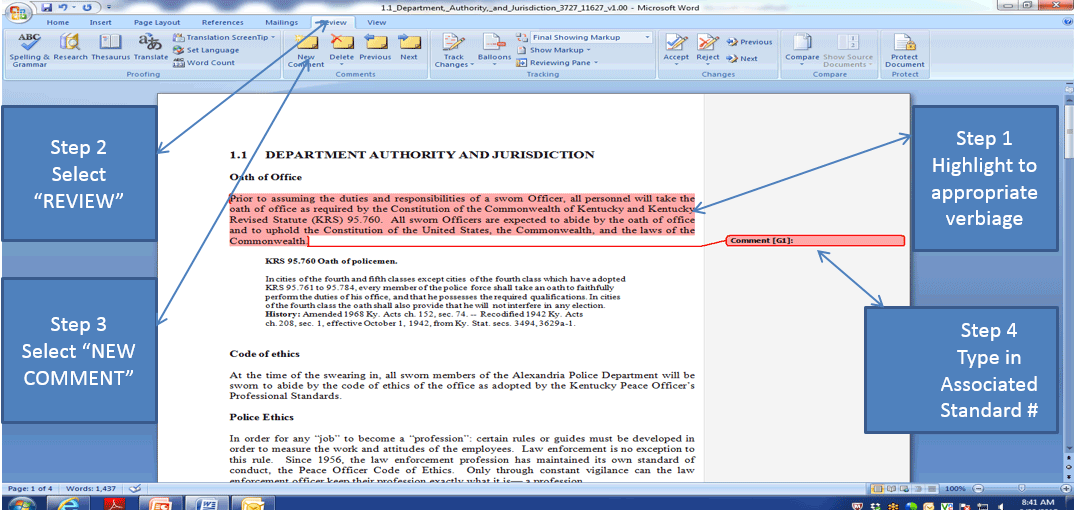
Highlight the section of the policy that aligns with a standard
Click on “REVIEW” in the top word menu
Then click on “NEW COMMENT” that will open up
Step 1
Highlight to appropriate verbiage
Step 2
Select “REVIEW”
Step 3
Select “NEW COMMENT”
Step 4
Type in Associated Standard #
Step 6 Flagging Policy Verbiage
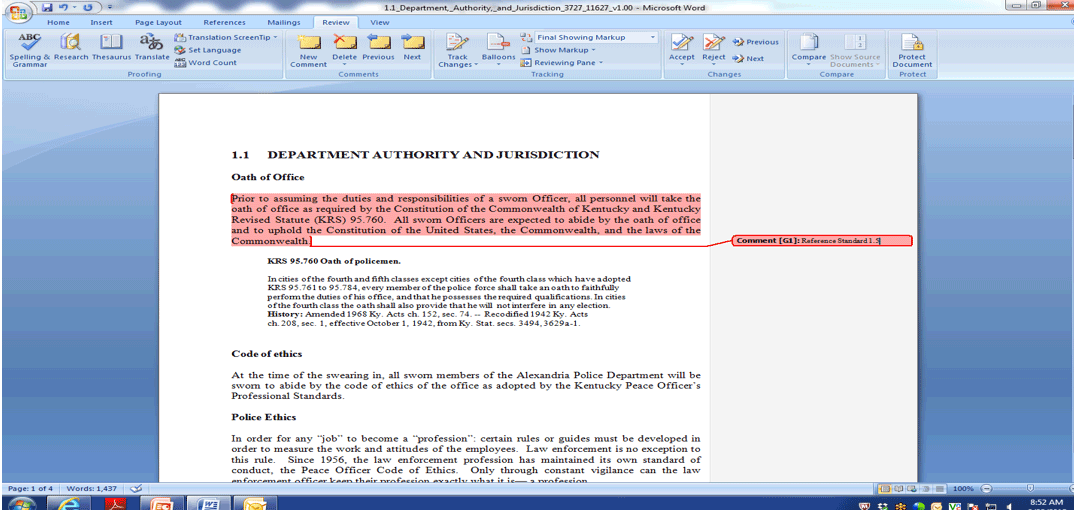
A dialog box will open and you would then type in what standard this particular highlighted verbiage applies to.
I have typed in “REFERENCE STANDARD 1.5” AS AN EXAMPLE
Viewing Flagged Policies
Once you have either loaded a flagged policy or opened the document in “EDIT POLICY DOCUMENT” and flagged, you will be able to view the flagged verbiage
Note: If you flag using the “EDIT POLICY DOCUMENT” feature, please note that it will take a few hours to buffer into the Word App View
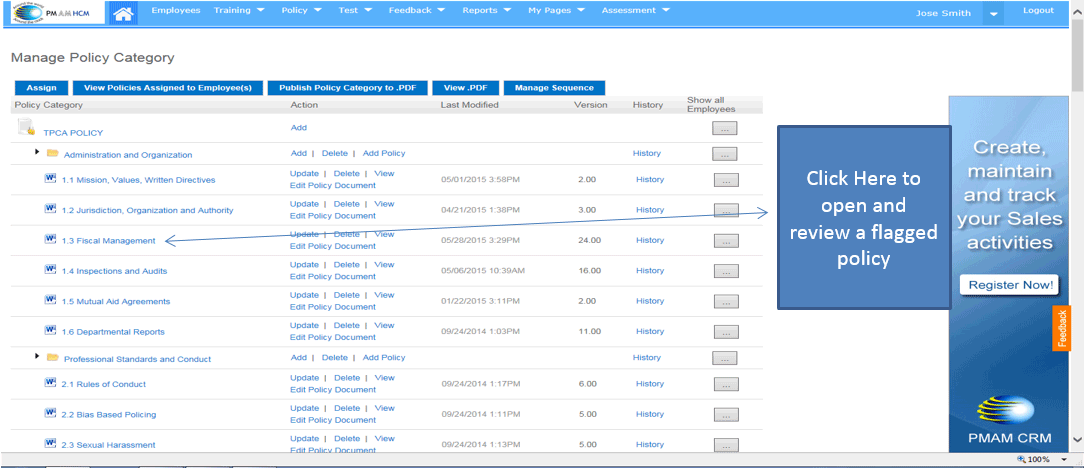
Viewing Flagged Policies
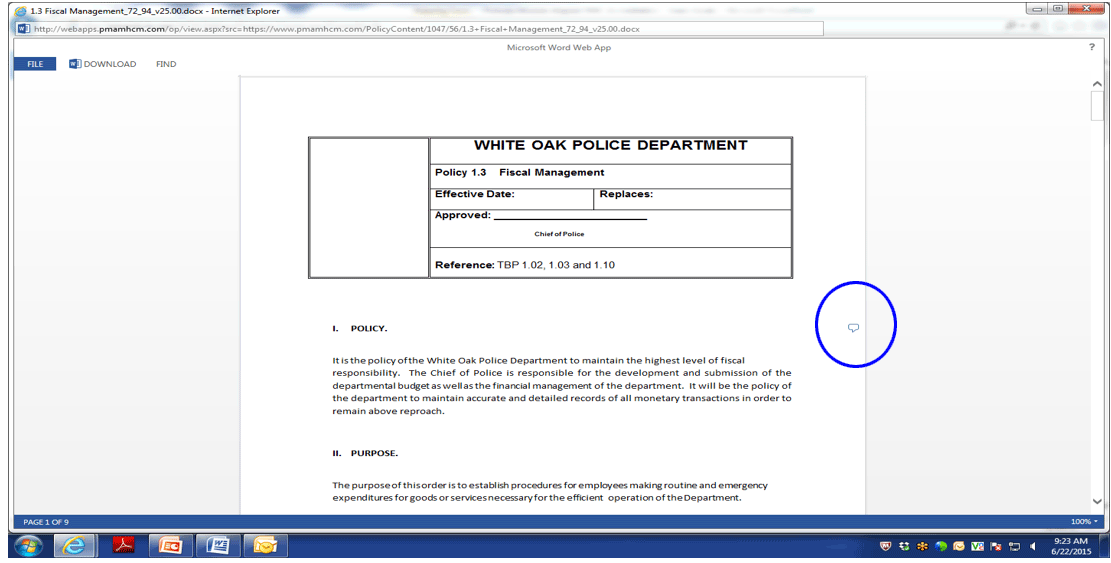
Once you have opened the policy document in the Word App format, you will see a flag to the right side of the text
Click on the flag to view
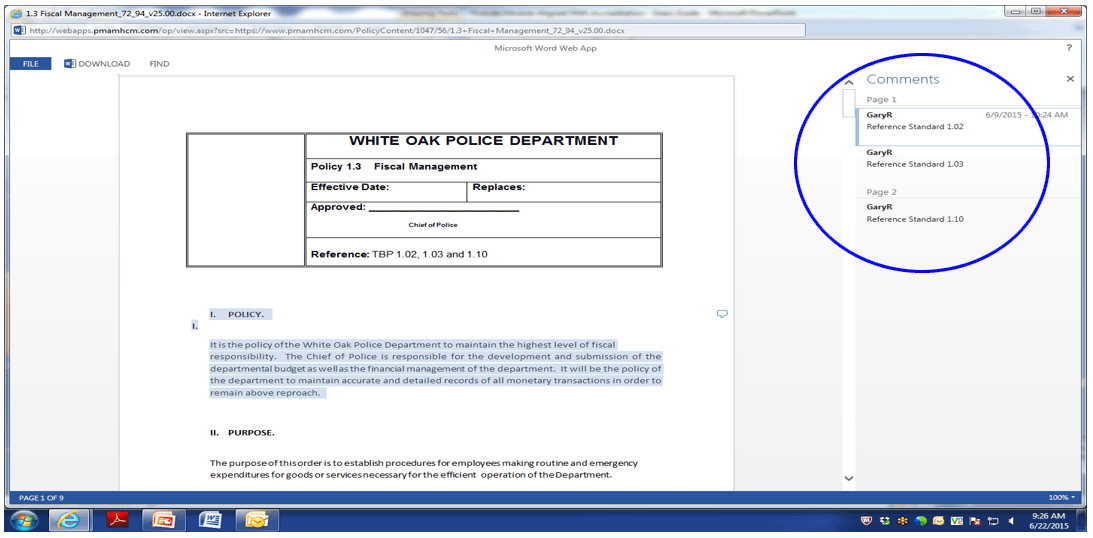
Each flagged area in a policy will be listed over to the right once you click on any one of the flags
If you click on “Reference Standard 1.02, that specific verbiage comes up highlighted for review
Repeat the process to see the other standard verbiage for review
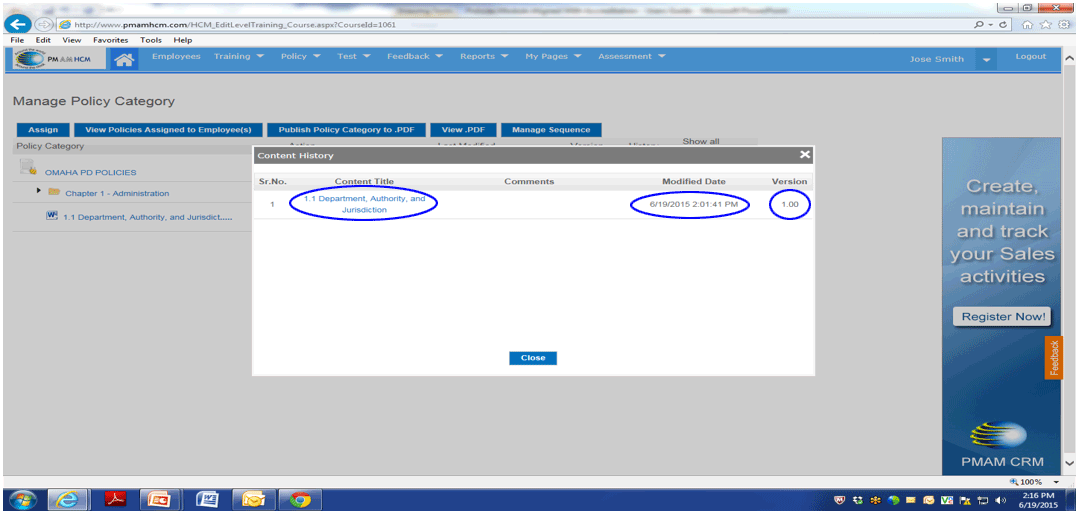
History
The PM AM HCM is a historic record of all data loaded and signed off on.
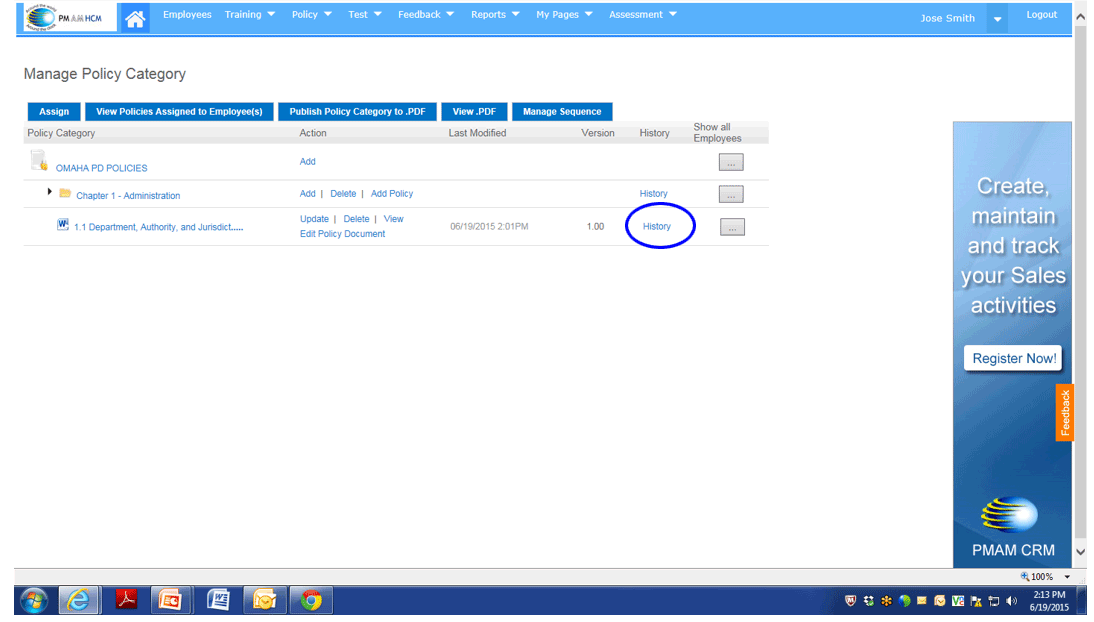
As it relates to policies loaded, you can click on “HISTORY” to see every change in addition to being able actually view past versions.
Click on History to View all versions
Viewing Historic Versions
When clicking on History, you will see every version, from version 1 forward including a date and time stamp. You can click on and open whatever version you would like to see at any time.
